

Stay Powered, Stay Calm: Why Portable Power Stations Matter
As hurricane season approaches, we prepare by choosing the right portable power station to keep essential devices alive, preserve comfort, and reduce stress. This six-step checklist guides our choices, charging plans, safe use and readiness so we stay calm connected.
Compare this with Explorer 500 vs Yeti 500: Portable Power Showdown comparison / or We Compare EcoFlow River 2 vs Jackery 500 for Blackouts comparison
What We Need Before We Begin
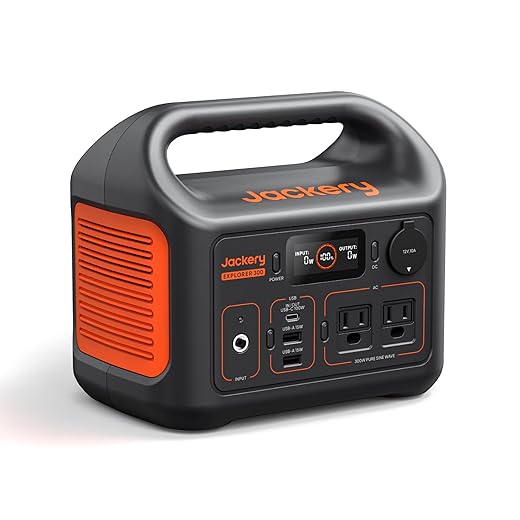
Step 1: Choose the Right Capacity and Features
Why bigger watt-hours beat panic: pick a station that keeps us powered for days, not hours.List every device we want to run, noting starting and running watts and how many hours per day (e.g., phone ~10 Wh/charge; fridge 100–200 W running, 800–1,200 W start).
Calculate daily watt-hours: multiply each device’s watts by hours, sum totals, then add a 20–30% safety margin for inefficiency and unexpected loads.
Choose a power station whose usable watt-hours exceed our highest estimated daily demand and whose continuous output (W) handles the largest single-device draw.
Consider multi-day outages: pick larger capacity or plan solar/vehicle recharging; remember greater capacity usually increases weight and reduces portability.
Check these core specs before buying:
Step 2: Create a Personal Power Plan
What exactly will we run — and for how long? Planning beats panic.List each device, its watt draw, and required daily hours (e.g., fridge 150 W running → 3,600 Wh/day; phone 10 Wh/charge → 30 Wh/day).
Categorize devices into groups and set rules:
Calculate total daily watt‑hours, add a 20–30% buffer, and map runtime windows (morning, evening) to spread demand — for example, run the fridge and CPAP continuous, charge phones in a timed evening slot.
Designate which outlet/port each device uses (AC Outlet A → fridge, USB-C 1 → phones) and label cables.
Plan charging cycles for the station, decide solar/vehicle/fuel recharge frequency, and prepare a simple written checklist to follow when the storm arrives.
Step 3: Set Up, Test, and Practice Before the Storm
Don’t wait for the wind to test us—simulate outages now and avoid surprises later.Set up the station in a ventilated, dry area away from flood risk and direct sunlight.
Install extra batteries or solar panels per manufacturer instructions and secure mounts and cable runs.
Fully charge the station and all backup batteries before a storm; maintain a regular top‑up schedule to keep state‑of‑charge optimal.
Test every outlet and port by running each prioritized device for a realistic duration—run the fridge for 30 minutes, a CPAP for an hour, and phone charges to full—to watch for overheating, voltage drops, or unexpected shutoffs.
Verify the display readings: battery %, inverter temperature, and alarms.
Practice switching loads and using any integrated transfer switch by simulating a grid outage so circuits transfer seamlessly.
Keep a fire extinguisher and basic tools nearby.
Log results, tweak priorities, repeat tests monthly during hurricane season, update firmware/apps, label cables/ports, and store emergency contacts and serial numbers with the station.

Step 4: Manage Charging and Recharging Options
Solar, car, or wall — which recharge strategy actually keeps us online for days?Map AC charging windows and verify outlet or shelter access so we know when and where to top up—example: schedule slow overnight charging (10–20% capacity per hour) from 11 p.m.–6 a.m. when demand is low.
Size and position solar panels for peak sun (south‑facing, 20–30° tilt) and estimate daily harvest using panel watts × sun hours, then subtract ~25–35% for real‑world losses.
Keep high‑amp DC car charging as a backup; verify our vehicle’s outlet amperage and that we have compatible cables and adapters.
Manage charging windows to avoid deep discharge; follow manufacturer depth‑of‑discharge limits and recharge before we drop below recommended thresholds.
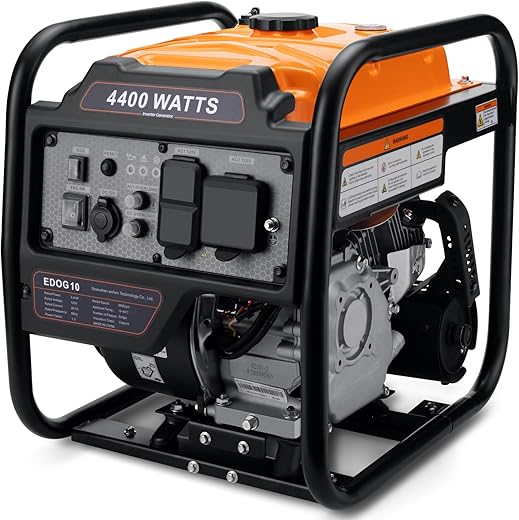
If using a gas generator, ensure ventilation, safe fuel storage, routine maintenance, and an isolation/transfer switch to prevent backfeed.
Test every recharge path and store fuses, adapters, and spare cables in a labeled kit.

Step 5: Safe Operation and Load Management
Avoid the single biggest mistake most users make — and keep everyone safe.Operate the station within manufacturer limits and follow common‑sense safety: never run the unit in an enclosed space or where it can get wet.
Balance loads across AC and DC outputs and avoid daisy‑chaining power strips; never exceed the unit’s continuous watt rating.
Important:
Never run in enclosed/wet spaces
Balance AC and DC loads
Avoid daisy‑chaining power strips
Never exceed continuous watt limits
Use monitoring tools (SOC, watts, temp)
Keep children and pets away
Use the station’s display or app to watch state of charge, input/output power, and temperature; set automatic shutdown thresholds if available. Label circuits and set timers to rotate heavy loads — for example, run a portable heater 20 minutes on, 40 minutes off. If a fault occurs, shut down, unplug loads, photograph error codes, and call technical support; keep contact numbers handy.

Step 6: Maintain, Rotate, and Store for Readiness
Like canned food, our power needs rotation — here’s how to keep the station ready year after year.Inspect monthly: look for cracks, frayed cords, swollen cells, or corrosion on terminals. Example: we found a loose AC plug during a drill and fixed it before a storm.
Perform quarterly full charge–discharge cycles if the manufacturer recommends them to keep cells calibrated and healthy.
Keep these habits in our routine:
Rotate portable batteries or secondary units so wear is even—swap primary/backup every 1–3 months or after defined cycle counts.
Store at about 50% state of charge in a cool, dry place; top up every 3–6 months to prevent degradation.
Maintain a log of inspections, test results, and purchase dates, and schedule reminders so we retire aged units before they fail.
Ready, Rehearsed, and Resilient
We’ve built this six-step checklist to choose, prepare, and operate portable power stations for hurricanes; follow it, rehearse annually, try it, share your results, and help keep our families safer.



46 comments
One more practical note: extension cords are lifesavers but make sure they are heavy-duty and rated for outdoor use if you run things outside. I saw a post-storm fire report from using cheap cords. Be careful out there.
And never run cords through doorways where they can be pinched. Gets damaged fast.
Important safety reminder. Use properly rated cords, avoid daisy-chaining, and keep connections off the ground if water is present. Safety first.
Maintenance section was underrated. Rotate your battery stash! I keep two small units and swap them monthly into rotation so none sit drained for months. Batteries hate being idle for too long.
Anyone got a simple calendar system they use for rotation reminders?
Nice practice, Ethan. Regular top-ups and rotation extend lifespan. A calendar reminder or phone alarm works well — consider marking the battery’s last full charge date on the unit if there’s space.
I use Google Calendar with recurring events labeled ‘Rotate Power Pack A/B’. Works like a charm and sends reminders to the whole family.
Appreciate the checklist format. Quick ask: any recommendations for portable stations that balance weight vs capacity? I’m older and can’t lug 60lb bricks but want decent runtime for essentials.
Consider wheels or a small dolly if you have heavier units. Makes moving a lot easier.
I got a 700Wh unit that weighs about 18 lbs — perfect compromise. Pair it with a small 100W panel and you’re set for essentials.
Look for lithium-iron-phosphate (LiFePO4) options or high-energy-density lithium units in the 500–1000Wh range — they often hit a sweet spot for weight and runtime. Brands vary; check user reviews for durability and actual tested runtime.
Loved the ‘Set Up, Test, and Practice’ step. 100% agree — don’t wait until the storm.
I ran a weekend drill with my family: unplugged the house fridge, hooked it up to the station, timed everything, and had everyone practice switching essential circuits. Felt dumb at first but we learned a lot. Highly recommend.
This is a fantastic idea. We did a dry run last year too and caught a wiring mistake before it mattered. Family drills = peace of mind.
Excellent example, Derek. Drills help spot overlooked items (adapter fit, cable lengths, outlet placement). Thanks for sharing your process!
Question about charging options — section on car charging vs wall vs solar was super helpful, but can someone clarify charge times? I have a 2000Wh station and a 120W solar panel. How long would solar take in ideal sun??
I used a 200W panel with a similar sized unit and got it to about 80% in two full sunny days. Solar is sloooow but steady. 🙂
In perfect sun, 2000Wh / 120W = ~16.7 hours. In reality you’ll get less (panel angle, clouds), so plan multiple days or combine with AC charge if you can. Solar is great for multi-day outages, not quick refills.
Right — solar is great for topping up or long-term use. Also check if your station accepts parallel input (some accept higher wattage) and MPPT efficiency. Combining panels or using a higher-watt panel cuts charge time significantly.
I was surprised the guide mentioned CPAP specifically — good call. PSA: if you rely on medical devices, test them on the station several nights in a row before storm season. The first night I tried mine it turned off unexpectedly because of a runtime estimate error. Scary.
Also have backup plans like a neighbor with a generator or local shelter info printed with your power plan.
Critical point, Hannah. Medical devices need thorough testing and contingency. Also check for adapter compatibility and confirm uninterrupted runtime with margin.
Yes — simulated multi-night test is a must if someone depends on a device. Hospitals do drill scenarios; we should too at home.
Some constructive feedback: the guide could use a quick cheat sheet for common devices — like approximate watts for fridge, CPAP, phone, lights. The text mentions it, but a one-page table would make planning faster. Also, include notes about firmware updates — my station bricked after an ignored update last year lol.
Good call, Patrick. A quick reference table is a great addition and we’ll consider adding it. About firmware: always back up settings if possible and apply updates during non-critical times. We’ll add a caution note.
Yes to the table. And +1 on firmware — I update mine only after testing a small charge cycle to make sure nothing odd happens.
Loved the emotional angle in ‘Stay Powered, Stay Calm.’ It reminded me that prepping isn’t just gear — it’s about feeling in control. Little things like checklist prints and practiced swaps really reduce panic. 😊
Agree 100%. When I’m calm, decisions are better and kids follow instructions sooner. It’s contagious!
Also good to plan for entertainment — charged power can keep a tablet going and help morale during long outages.
Exactly — mindset matters as much as gear. Rehearsal builds confidence. Thanks for highlighting that aspect.
Great checklist — saved me a ton of time. I especially liked the ‘Create a Personal Power Plan’ section. I ended up mapping out what I absolutely need to keep running (router, fridge, CPAP) and how long each will last at different charge levels.
Quick question: is it realistic to run a small chest freezer for 24 hours on a 1500Wh unit if I only open it sparingly? Anyone tried that?
I had a similar setup last season — 1500Wh did about 10-14 hours for my small freezer. If you pre-freeze ice packs and keep it packed tight, you can stretch the time. Definitely monitor temps.
Also remember start-up surge — freezer motors spike when kicking on. Make sure your inverter can handle the surge wattage, not just continuous.
Thanks, Maya — glad the plan idea helped. A 1500Wh unit might run a small chest freezer for ~8–12 hours depending on compressor efficiency and cycle time; 24 hours is optimistic unless the freezer is very efficient and you limit openings. Consider adding a solar panel or a second battery for extended outages.
Funny story: I tried to ‘optimize’ by connecting two different brand stations in parallel and the charge controller freaked out. Don’t mix brands unless they explicitly support paralleling. Learned that the hard way. 😅
Mixing brands can cause issues with communication between units and uneven charging. Always follow manufacturer guidance for paralleling. Glad you’re sharing this warning.
Yep — some brands lock you out or refuse to balance. Stick to same model/brand or dedicated parallel kits.
This guide was super thorough but I felt it assumed some tech comfort. Maybe add a ‘For Non-Techies’ sidebar with simple steps: label cables, keep adapters, test once a month, and a printed power plan on the fridge? My mom needs that level of simplicity.
Great suggestion, Rashida. A plain-language quick start for less technical users is a good idea. We’ll draft a simple checklist for labeling and basic monthly checks.
Yes, and include pictures. Visual guides make things 100x easier for parents/grandparents.
Printed plan on the fridge = lifesaver. Even in power outages you can see who does what.
Little PSA: keep the manual and any adapter specs with the unit. I once needed a weird DC adapter and had to improvise with a paperclip and some prayer lol. Don’t be me. 😂
Take a photo of serial numbers and model numbers and store them in cloud notes too — useful for warranty/support later.
Haha — paperclip improvisation not recommended! Keeping manuals and required adapters together is a simple but important tip. Maybe a DIY kit checklist would help readers avoid last-minute jury-rigs.
Also, label which adapter matches which device with masking tape. Saves fumbling in the dark.
A bit of skepticism: the guide pushes a lot of solar as a rescue, but for some folks the upfront cost is huge. Maybe a note about cost-effective mixes (small solar + car charging + community charging stations) would be helpful. Not everyone can drop $$$ on panels.
Valid point. We’ll add a section on budget-conscious strategies — combining smaller panels, car charging, energy-sipping habits, and community resources can be an effective, lower-cost approach.
Totally — even a cheap 100W panel plus cautious usage gets you through a day or two. Community hubs are underrated too.